Tuesday, September 24, 2013
House for Five feature!
I want to send a huge THANK YOU over to Deme at House for Five for featuring our playroom makeover today! If you haven't already, pop on over and check out her fabulous blog. It is one of my favorites, you won't be disappointed!
Saturday, September 21, 2013
Taking on the Laundry Room
I recently tried to spruce up our laundry room. It is a place we see often and use constantly. In addition to doing laundry, we also use the space for storage and as a mudroom. Yes, this tiny space is pulling triple duty! Which is why I felt something had to be done to save my sanity.
Here is our laundry room when we first moved into our new house...


Let's take one last look at the before and after....
Thanks for stopping by today!
Here is our laundry room when we first moved into our new house...
 |
| Before |
 |
| Before |
And here is our laundry room today....
 |
| After |
 |
| After
One of my very first blog posts was on organizing our hall closet at our old house. Most of these bins (along with the junk inside them) were from that closet makeover. Since I already had containers, organizing was easy.
   I made new labels for the bins, hung some vintage hooks on the wall that I already had, and installed the new key hooks.    Since we don't own our house painting wasn't really an option but the walls desperately needed some color. I found some cute contact paper for a good price and I think it gives the room just the look I was going for. 
I used four galvanized buckets on the shelf. One for Oxy clean, one for detergent, one for trash, and the last one for extra supplies I buy in bulk, such as dryer sheets and spray 'n wash.
You may recognize the chalkboard labels from my playroom makeover. When I bought them they came in a package of 12, and at the time I thought that was way too many, but they were cheap so I bought them anyway. Well I have used almost all the chalkboard labels now, I love them so much I may need to order more!   
Above the dryer are these small buckets I found in the dollar section at Target. I think they are so cute. They keep clothes pins, mesh wash bags, and dryer sheets handy
|

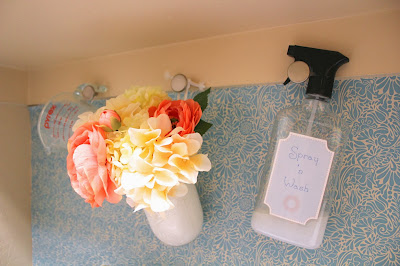
Over the washer I hung three knobs that hold a measuring cup I use for bleach, Spray 'n Wash, and a jar of flowers because this space just needed some pink!

This pretty white metal basket is also from Target. It holds our bleach and fabric softener.
I think my favorite part of the room is the quote I typed up and pinned to the basket. It helps me smile when doing laundry, which is a miracle in itself!


Probably the most helpful part of the room is this little "Guide to the Laundry Room". Seriously, I can't be the only one who is dumbfounded by the care symbols on clothes, right? Well, confusion be gone! I now know that a triangle means I can use bleach and that a circle means dry clean only!
Let's take one last look at the before and after....
 |
| Laundry Space "Before" |
 | ||
Laundry Space "After"
|

 |
| Storage Space/Mudroom "After" |
Thanks for stopping by today!
-Chloe
Friday, August 30, 2013
Garden Twine Initial
My little guy has something new in his room that he absolutely loves! If you came to our house he would love to show it to you and tell you that "E is for Everett".

This was an easy project and I (as usual) made it all out of things I had on hand.
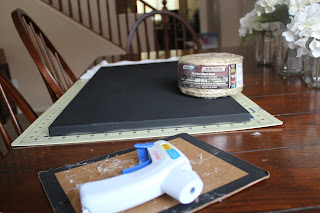
I started by cutting the letter out of cardboard with a razor blade. Then I just tightly wrapped the twine around. This is just simple garden twine used to tie up plants but I have used it several times when decorating our house.


I feel like I say this all the time, but I really really love making things out of stuff I already have, and also making things up as I go along. I don't know why, but it makes me feel so good and energized! It puts me in my own little world where time passes way too fast and I would never notice that the kids have dumped the giant carton of goldfish onto the couch and are now dancing on them (yes, that happened), or that it is 5:00pm and we are all still in our PJs (also happened). I cant' be the only one, right? Does anyone else feel the same way?
-Chloe

I started by cutting the letter out of cardboard with a razor blade. Then I just tightly wrapped the twine around. This is just simple garden twine used to tie up plants but I have used it several times when decorating our house.

In the picture you can see I began wrapping the letter vertically first but that was a mistake. I had to undo it and start over wrapping the twine horizontally, then wrap vertically. When I got to the end of the letter I would just hot glue the last bit of twine to the back.
The frame was an ugly color of oak so I painted it white, and the gingham fabric was left over from when I made my son's curtains. I hot glued the E onto the fabric but still thought it needed a little something extra, so I added the red ribbon on top. The ribbon is just for decoration, it is not actually holding the weight of the frame.
Here it is finished hanging in his room!


I feel like I say this all the time, but I really really love making things out of stuff I already have, and also making things up as I go along. I don't know why, but it makes me feel so good and energized! It puts me in my own little world where time passes way too fast and I would never notice that the kids have dumped the giant carton of goldfish onto the couch and are now dancing on them (yes, that happened), or that it is 5:00pm and we are all still in our PJs (also happened). I cant' be the only one, right? Does anyone else feel the same way?
-Chloe
Friday, August 16, 2013
Nautical Playroom Reveal!
I am so happy today to finally be showing you our completed playroom! When I began this, I had plans of pretty paint and wainscoting for the walls but when we thought we may be moving, those plans were put on hold. We decided that we would be renting a house when we moved to Arizona so paint and wainscoting was no longer an option. It can be hard to get the feeling you want in a house when you have to work around existing paint colors, but I am totally happy with how this room has come together!
Let's go back and remember where we started with the "before" pictures from our last house.


The biggest challenge we had was with space. Specifically, the lack of space. This new loft playroom is about 1/4 the size of our old basement playroom. A couple of the bigger toys, like my daughter's kitchen and my son's rocking airplane, had to be moved to the kids bedrooms. This has worked out very well since their bedrooms are right next door to the playroom.
Okay, enough of this chitchat, lets get to the reveal!


I have already blogged about using two Expedit shelving units from Ikea for our toy storage (You can read all about our toy storage here) and they have been absolutely perfect! Toys are always neat and easy to find.
I made the curtains, and all new pillow shams (except for the "map"one which is from Ikea) to give new life to our old sofa. I bought the fabric for the curtains and used what was leftover to make the pillow shams along with some other fabric I had on hand.


For the small pillow, I made the same kind of knot I used on the lampshade (You can find that tutorial here) and some burlap ribbon I found in the floral department. I just kind of made the shams up as I went along but they all totally work! Don't you love it when that happens?
My son recently inherited a large Lego collection from my little brother. The Legos have been stored in this blue tub. The tub works well and fits perfectly in one of our cubbies, but I wanted to spruce it up a bit. I spray painted the front with chalkboard paint and added a piece of rope for a handle.


Ever since I first made these artwork display frames, I've wanted to label them somehow to make them specific to each child. I ended up making these rope initials.

 All I did was hot glue (you may have noticed by now that I am slightly obsessed with my glue gun and use it almost daily) rope to a piece of card stock in the shape of the letter, then cut it out with an X-acto knife.


The kids art caddy is from Target and I glued the little chalkboard label on the front. It is always stocked with Color Wonder mess free markers and paper. Our kids get into this daily and bring me new works of art to be displayed. I have a separate bin of "messy" art supplies that we get out and use together. My kids cannot be trusted to be alone with even a single crayon!

 This chalkboard was originally a magnetic bulletin board from Ikea that we had in our home office. We hadn't been using it since the move, so I gave it a few coats of chalkboard paint and hot glued rope around the edge for a little extra charm. We had some old brightly colored magnet numbers that I decided to paint white and bring up to the playroom. To hold chalk and an eraser, I used a small pale I got at Target for a buck.


Let's go back and remember where we started with the "before" pictures from our last house.


Pretty depressing, right?
The biggest challenge we had was with space. Specifically, the lack of space. This new loft playroom is about 1/4 the size of our old basement playroom. A couple of the bigger toys, like my daughter's kitchen and my son's rocking airplane, had to be moved to the kids bedrooms. This has worked out very well since their bedrooms are right next door to the playroom.
Okay, enough of this chitchat, lets get to the reveal!
Drumroll please......


I have already blogged about using two Expedit shelving units from Ikea for our toy storage (You can read all about our toy storage here) and they have been absolutely perfect! Toys are always neat and easy to find.
I made the curtains, and all new pillow shams (except for the "map"one which is from Ikea) to give new life to our old sofa. I bought the fabric for the curtains and used what was leftover to make the pillow shams along with some other fabric I had on hand.


For the small pillow, I made the same kind of knot I used on the lampshade (You can find that tutorial here) and some burlap ribbon I found in the floral department. I just kind of made the shams up as I went along but they all totally work! Don't you love it when that happens?
My son recently inherited a large Lego collection from my little brother. The Legos have been stored in this blue tub. The tub works well and fits perfectly in one of our cubbies, but I wanted to spruce it up a bit. I spray painted the front with chalkboard paint and added a piece of rope for a handle.


Ever since I first made these artwork display frames, I've wanted to label them somehow to make them specific to each child. I ended up making these rope initials.

 All I did was hot glue (you may have noticed by now that I am slightly obsessed with my glue gun and use it almost daily) rope to a piece of card stock in the shape of the letter, then cut it out with an X-acto knife.
The lantern I got a Walmart for less than 4 bucks. I thought it was cute black, but painting it white would help give the room the light airy feeling I was going for.


How many chalkboards can you fit in one playroom?
The answer is...well... A LOT!


Tuesday, August 13, 2013
Some (MAJOR) changes and a DIY nautical knot lampshade tutorial
First off, there have been some huge changes around here, the biggest being that we have MOVED! Yes, we put so much love and work into our last house but we always knew we would be leaving before long. The Mr. got a new job in Phoenix, Arizona so we put up a For Sale sign and headed south. We plan to be here for about 1-2 years so for the time being we are renting a house in an awesome neighborhood just outside of Phoenix.
Renting has presented a whole new set of storage/decorating/organizing challenges, and it seems I have been tackling them all at once! Back in Utah my biggest project was making our playroom pretty and organized (you can catch up on old posts about it here and here), so that is where I want to start. We are still sticking with the nautical theme for the playroom and before I reveal the entire finished room I want to share this nautical knot lampshade I came up with today.

I bought the plain beige shade at Walmart along with the lamp that was a dark copper color until I gave it a few coats of white spray paint. The rope is from the laundry isle (hangers, baskets, clothes pins, etc.) and is meant to be a clothes line. I am so glad I picked that up! I wasn't sure what I would use it for, but at less than $2 a package I couldn't lose.


Renting has presented a whole new set of storage/decorating/organizing challenges, and it seems I have been tackling them all at once! Back in Utah my biggest project was making our playroom pretty and organized (you can catch up on old posts about it here and here), so that is where I want to start. We are still sticking with the nautical theme for the playroom and before I reveal the entire finished room I want to share this nautical knot lampshade I came up with today.
It was easy to make and I am totally in love with how it turned out.

I bought the plain beige shade at Walmart along with the lamp that was a dark copper color until I gave it a few coats of white spray paint. The rope is from the laundry isle (hangers, baskets, clothes pins, etc.) and is meant to be a clothes line. I am so glad I picked that up! I wasn't sure what I would use it for, but at less than $2 a package I couldn't lose.

I searched on Pinterest for a tutorial showing how to tie a nautical knot and found this one which is actually for a knot headband but there are good, easy to follow instructions for tying the knot.

I was in love already!

Hello gorgeous! Where have you been all my life?
After I got the knot nice and flat I hot glued it to the shade.

Then, zig zagged hot glue across a few inches of the rope and stuck it on the shade. I just repeated that all the way around the shade with all four groups of rope strands.

And I was done! I told you it was easy!

Here is a sneak peak of the playroom with the lamp all finished!

Thanks for stopping by after all this time! I can't wait to share everything else I've been working on!
-Chloe
Subscribe to:
Posts (Atom)